The Best Kitchari Recipe – An Ayurvedic Cold & Flu Superfood

I was raised on kitchari (pronounced kitch-a-ree). We ate it at least once a week (emphasis at least). As a child, it was a comforting meal that made me feel warm and full. I liked to squeeze lemon on top or make a well in the middle of the bowl and fill it with a dollop of yogurt. I knew it was good for us, full of protein, and something we were supposed to eat, but I didn’t realize HOW good it was until just a decade ago.

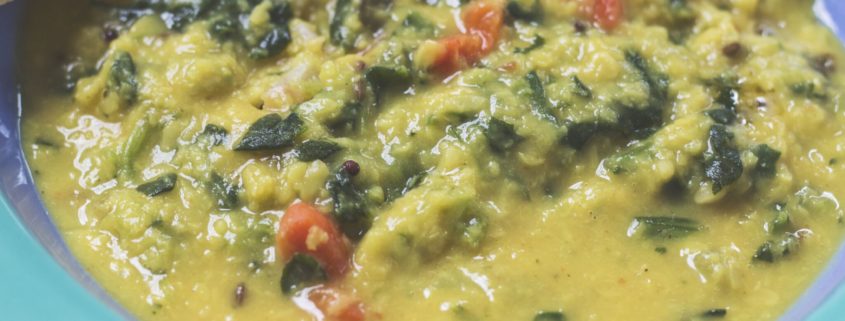
Kitchari is a is a savory porridge made from mung beans, rice, spices and vegetables. It has a multitude of benefits including the removal of toxins, resetting the digestive system and restoring nutrition. This meal is balancing or all constitution types, and the split mung beans are easy to digest, even people with weak digestion systems.

When rice and mung dal is combined, it creates a complete protein with the joining of the individual amino acids. This doesn’t happen when you eat rice or beans alone, which is why the meal of “rice and beans” is so important as a combination for protein purposes. In some Ayurvedic cleanses, kitchari is used as a cleansing meal. The spices help to encourage healthy agni or a strong digestive fire. The astringent quality of the mung dal helps to remove toxic buildup in the intestinal lining in more of a gentle way as opposed to raw veggies.

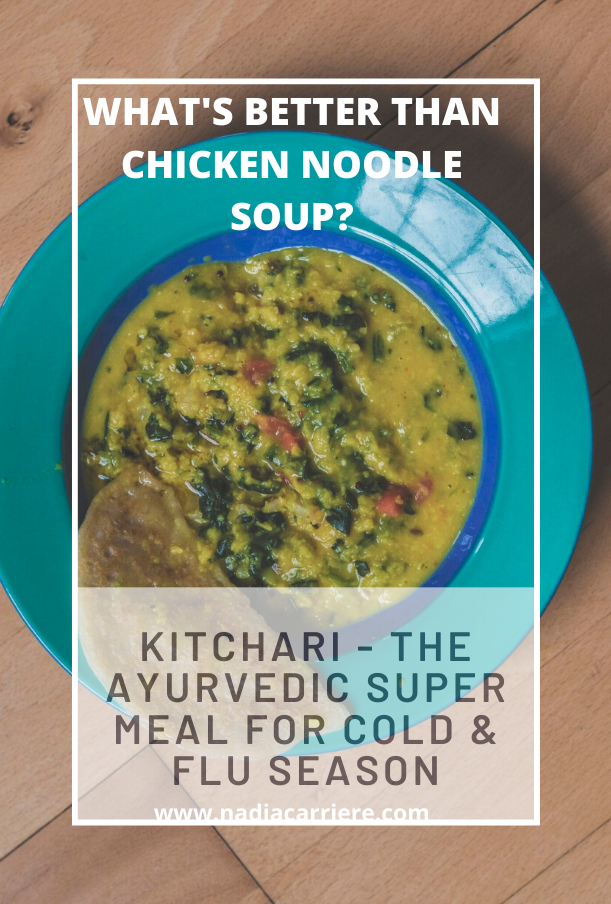
HOW TO MAKE KITCHARI & WHAT YOU’LL NEED

  • 1/4 teaspoon black pepper
  • 1 cup packed baby spinach roughly chopped

Instructions

  1. Rinse the mung dhal  and rice in a fine strainer under cold water until the water runs clear (might take a couple of minutes). Drain completely and set aside.
  2. In a large pot, over medium-high heat, heat the ghee (you can also use coconut oil if you want to veganize it).  Add the carrots, celery, and onions, and cook until the onions are translucent.
  3. Add the ginger and cook, stirring, for 30 seconds.
  4. Next, sprinkle the rest of the spices over the vegetables, and cook for 30 seconds until the spices start to get fragrant.
  5. Add the mung beans, green beans, and rice and stir to coat in the spices. Add the salt and pour in the water or vegetable stock.
  6. Bring to a boil, cover, and reduce the heat to medium-low. Simmer for 35-45 minutes, stirring occasionally, until the mung beans are tender but not mushy and most of the liquid has been absorbed. (You may need to keep adding more water if the mixture becomes to dry or begins to stick to the bottom of the pan).

Serve with lemon wedges and freshly chopped cilantro (optional).

Peaches ‘n Cream Cake – Grain Free, Dairy Free, Vegan, No-Bake

It’s peach season! Sweet, warm, fuzzy and dripping with goodness. I was looking for a way to use up my peaches and decided to make this ice cream/cream cheese ‘esque type of dessert.

This is divine and so incredibly easy to make. You can make it vegan by eliminating the bee pollen garnish.

Crust:

2 cups almond meal or coarse almond flour
1 tsp cinnamon
1/4 tsp salt
2 tablespoons water
2 tablespoons coconut oil (it should be liquified which isn’t an issue in the summer. You know it’s warm when your coconut oil is never solid).
1 tablespoon maple syrup
1/4 tsp vanilla extract
1/4 tsp almond extract

Filling:

4 large (not the small ones) ripe peaches, pitted and chopped (keep the skins on)
4 tablespoons tahini
4 tablespoons maple syrup
1/2 cup coconut cream
2 tsp vanilla

Garnishes (optional)

  • whipped coconut cream
  • freshly sliced peaches
  • bee pollen
  1. Mix all of the crust ingredients in a bowl and add the water 1 tablespoon at a time until a soft dough forms. Press it in a nonstick, or parchment lined 12″ springform pan and place in the fridge.
  2. Next, place the peaches in a Vitamix, or heavy duty blender and puree. In a small pot, combine the rest of the filling ingredients until combined. Add them to the peaches and blend again until thoroughly mixed.
  3. Remove the crust from the fridge and pour the peach filling on top. Place the entire pan in the freezer until the filling is set (1-2 hours). Pull it, spread coconut cream on top, or any other garnish/garnishes of choice.

Enjoy!

Yes, I took a photo mid-eat. My family was in the midst of demolishing the rest so this is the best photo I had. Should have planned better!

,

How To Make Your Own Herbal Infusions & Why You Should


I grew up drinking herbal infusions. My mother had an obsession with Susan Weed and Rosemary Gladstar, and rightfully so. Both are wise women and herbalists whom I grew to admire greatly. Their work is considered ‘classic’ now and both have worked for years to bring the world of herbs mainstream and more accessible to the general public. They taught me what the difference is between steeped herbal teas and infusions and why they’re such an important part of your health. Read more

New Year Superfood Elixir ~ Vanilla Rose Adaptogenic Drink

We are pretty blessed to have magical ingredients at our fingertips. This is a creation of love with a side of gratitude. It’s stupid delicious, featuring some of our favorite superfoods. Mesquite to balance blood sugar, ashwaganda to soothe the nervous system, and maca to balance the hormones. It’s low glycemic and easy on the eye.

We hope you enjoy! Happy New Year!

Vanilla Rose Adaptogenic Shake

Prep Time:
15 mins
 
This is a creation of love with a side of gratitude. It’s stupid delicious, featuring some of our favorite superfoods. Mesquite to balance blood sugar, ashwaganda to soothe the nervous system, and maca to balance the hormones. It’s low glycemic and easy on the eye.
We hope you enjoy!

Course: Drinks
Cuisine: Indian
Servings: 2 persons

Ingredients:

1 1/2 cups pistachio milk recipe below
1 scoop protein powder of choice
1 tsp gelatinized maca
1 tsp vanilla powder
1 tsp ashwaganda
1 1/2 tsp mesquite powder
1/4 tsp cardamom
1 1/2 tsp rose water
A few drops of stevia or honey

Rose petals, bee pollen, pretty glass optional

Instructions:


Blend in a high powered blender, taste and swoon. 


If you are feeling extra, pistachio milk is quite easy to make at home. It’s rich in minerals, healthy fats, and antioxidants. It’s also quite filling, yet low in calories, in case anyone cares.
You will need 1 cup of raw, shelled pistachios. Soak them in cold, filtered water over night. Rinse thoroughly.
In your high speed blender combine the soaked pistachios with 4 1/2 cups of cold filtered water, a dash of Himalayan pink salt and a touch of honey, maple syrup works too.
 Blend on high until frothy, about 45 seconds. Strain through a cheese cloth or nut milk bag. Store in the fridge for up to 3 days.